3 Ways to Install an eSIM: QR Code, Install Button & Manual Setup
When you purchase a Tribies plan, you receive a separate email for each family member’s eSIM — all landing in the account manager’s inbox. One email per person, one QR code per email. That makes distribution easy:
- Forward each email to the right person and they can handle the install themselves
- Or skip forwarding entirely — just pull up each QR code on your phone and let each family member scan it
- Your own eSIM installs with a single tap of the install button, right there in your email
Three ways to install, depending on the situation. Here’s exactly how each works.
Before you start: Make sure your device supports eSIM. Check in Settings → Cellular (iPhone) or Settings → Connections → SIM card manager (Android). If you see an “Add eSIM” option, you’re ready to go.
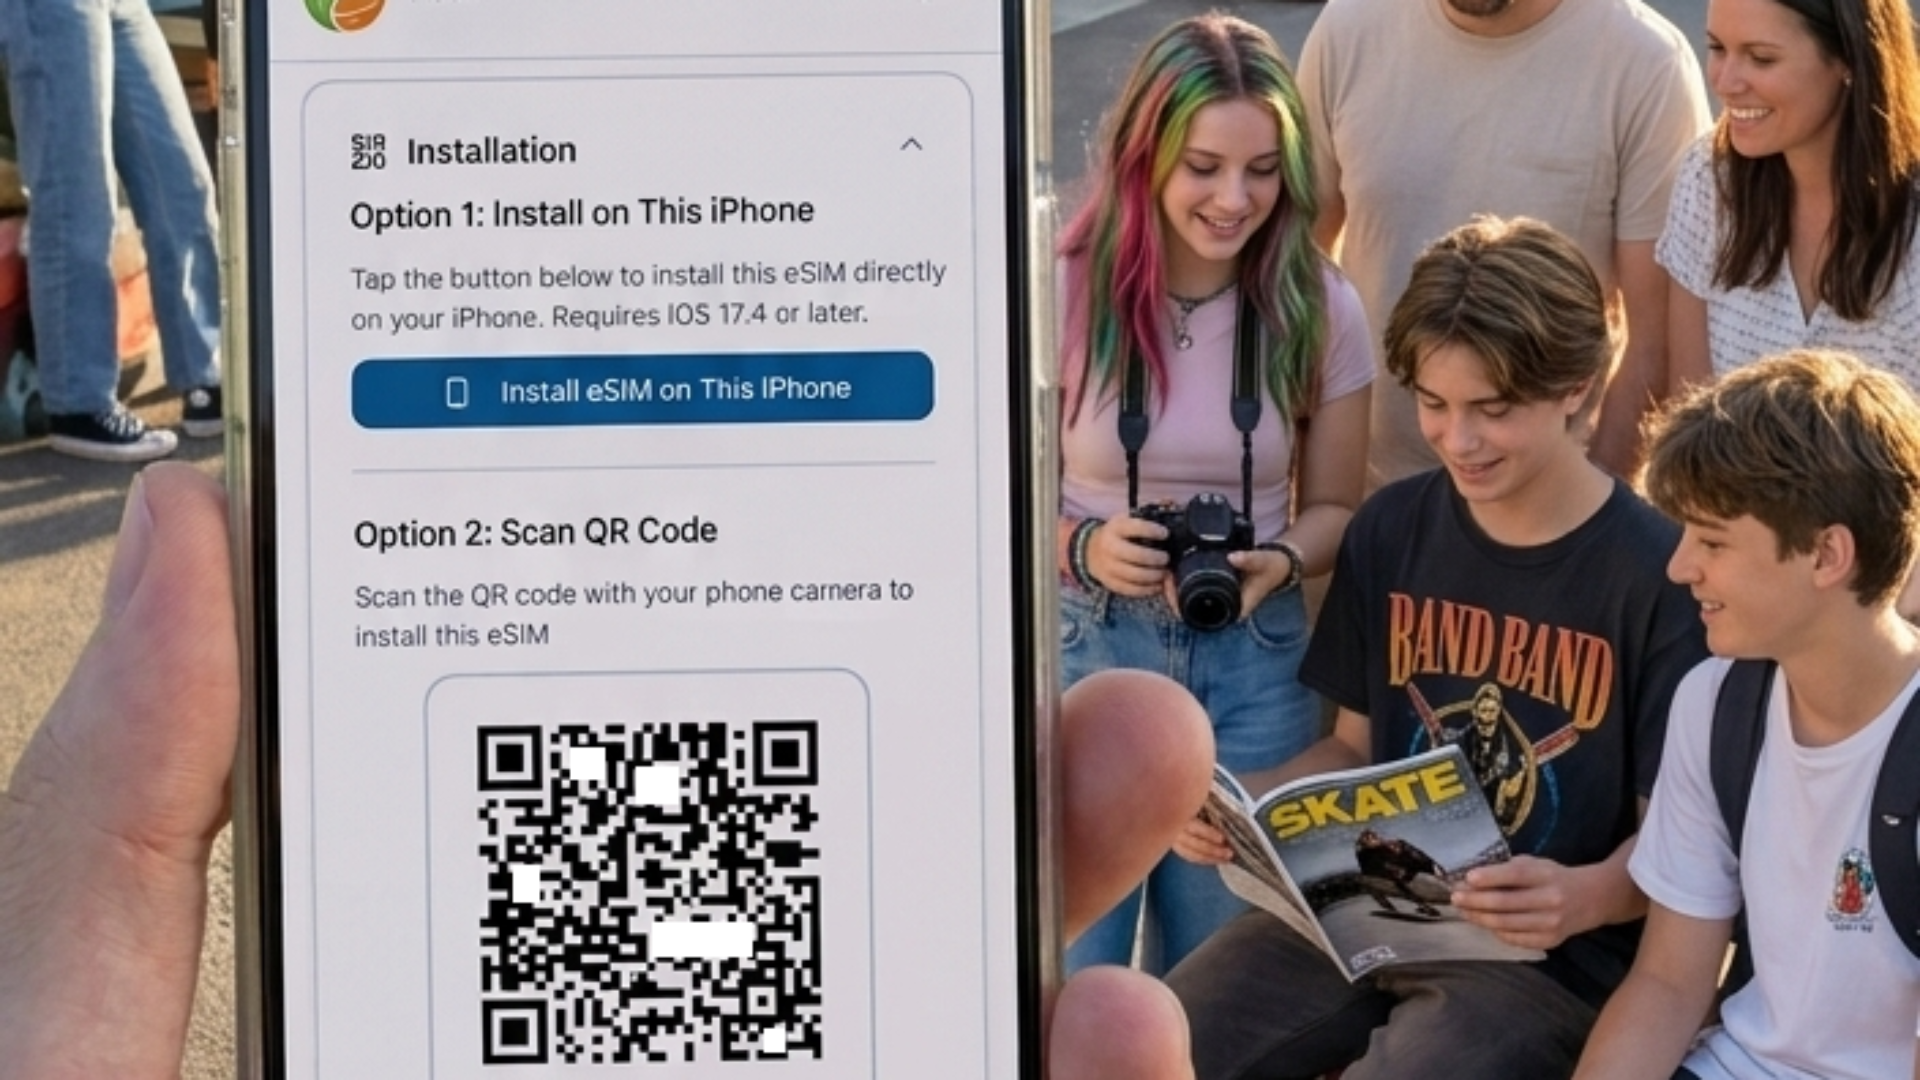
Method 1: Scan the QR Code
This is the most common method. The QR code is right there in the email — you just need to scan it with a different device’s camera.
When to use it: Open your installation email on a laptop, tablet, or another phone. Then use the phone that needs the eSIM to scan it.
The key thing: You’re scanning from the phone that needs the eSIM, pointed at the screen showing the QR code. No need to open Settings first — just open your camera.
On iPhone
- Open the installation email on a second screen (laptop, tablet, or another family member’s phone)
- On the phone you’re installing to, open the Camera app and point it at the QR code
- A notification appears at the top: “eSIM Activation — Tap to Add Cellular Plan” — tap it
- Follow the prompts to name the plan (e.g., “Europe Trip”) and finish setup
- When asked about your default data line: leave your home SIM as default — you’ll switch to the eSIM when you land
That’s it. No digging through Settings required.
On Android
- Open the installation email on a second screen
- On the phone you’re installing to, open the Camera app (or Google Lens) and point it at the QR code
- A prompt appears to install the eSIM — tap “Add” or “Install”
- Name the plan and confirm
The one limitation: The phone doing the scanning can’t be the same one showing the QR code. If the email came to the phone you’re installing on, use Method 2 instead.
Method 2: Install Button in the Email (Same-Device Install)
Each Tribies installation email contains an “Install eSIM on this device” button — specifically for the scenario where the email is already on the phone you’re setting up.
When to use it: The installation email is open on the phone that needs the eSIM.
On iPhone or Android
- Open the installation email on the phone that needs the eSIM
- Tap the “Install eSIM on this device” button
- A system prompt appears asking to add a new cellular plan — tap “Add” or “Continue”
- Done — no Settings navigation needed
The button contains a special link that your phone’s operating system recognises as an eSIM install request. It handles everything automatically.
From the Tribies Dashboard
If you’re managing the family plan from the web dashboard, you can trigger installs from there too:
- Open the dashboard on the device that needs the eSIM (or send the install link to that device)
- Find the eSIM for that person
- Tap “Install eSIM”
- Confirm the system prompt
This is great for helping less tech-savvy family members. You can trigger the install remotely — they just see a single “Yes/Add” prompt on their screen and tap it. No settings, no QR codes, no confusion.
Method 3: Manual Entry (The Fallback That Always Works)
Every eSIM comes with a manual activation code — a text alternative to the QR code. It’s longer to enter, but it works on any device and in any situation.
When to use it:
- The QR code won’t scan (bad lighting, dirty lens, etc.)
- Neither method above is working
- Your camera is unavailable
What You Need
In your installation email, look for:
- SM-DP+ Address — looks like
consumer.e-sim.global(the server address) - Activation Code — a long alphanumeric string, often joined with
$
On iPhone
- Open Settings → Cellular → Add eSIM
- Tap “Use QR Code”, then tap “Enter Details Manually” below the camera
- Enter the SM-DP+ Address and Activation Code
- Tap Next and follow the prompts
On Android
Samsung Galaxy:
- Settings → Connections → SIM card manager → Add eSIM
- Tap “Enter activation code”
- Paste the full code (SM-DP+ address +
$+ activation code) - Tap Connect
Google Pixel:
- Settings → Network & internet → SIMs → Add eSIM
- Tap “Don’t have a QR code?”
- Enter the code as shown in your email
Other Android phones: Look for “Enter manually” or “Use activation code” in your SIM/eSIM settings.
Quick Reference
| Situation | Best Method |
|---|---|
| Email open on a laptop or tablet | Scan QR Code (Method 1) |
| Email on a family member’s phone | Scan QR Code (Method 1) |
| Email open on the same phone | Install Button (Method 2) |
| Helping a child install remotely | Install Button via dashboard (Method 2) |
| QR code won’t scan | Manual Entry (Method 3) |
After Installation: Don’t Activate Yet
Whichever method you use, the eSIM is installed but not active. This is correct.
Your phone should now show two lines:
- Your home carrier (active)
- The new eSIM (installed, turned off)
Leave it turned off until you land. Many plans start their validity countdown the moment the eSIM connects to a network. Activating at home wastes your travel days.
Turn it on when you walk into the arrivals hall. That’s the moment you actually need it.
Setting Up the Whole Family
You have the email, you have all the QR codes. Two approaches work well:
Option A — Install together (quickest) Sit down with the family the evening before travel. Pull up each person’s QR code email on your phone and let them scan it. Takes about two minutes per person, no forwarding needed.
Option B — Forward and let them install themselves Forward each QR code email to the relevant person. They can scan it from another device or tap the install button if they open it on their own phone.
Either way:
- Do it the day before travel — not at the airport gate
- Install your own eSIM first — tap the install button in your email, confirm once
- Verify everyone’s phone shows the eSIM installed (but turned off) before you leave
Troubleshooting
QR code won’t scan
- Clean your camera lens
- Maximise brightness on the screen showing the QR code
- Try holding the camera 15–20cm away rather than very close
- Switch to Method 3 (manual entry)
“This QR code has already been used” Each code is single-use. If it was scanned accidentally without completing, contact Tribies support for a replacement code.
Installation fails or gets stuck
- Make sure you’re on a stable WiFi connection (required for eSIM installation)
- Restart the phone and try again
- Ensure iOS or Android is up to date
Ready to Get Set Up?
Check your Tribies installation email — you’ll find the QR code, the install button, and the manual code all in one place. If you haven’t purchased yet, tell us about your trip and we’ll put together a plan for your family.
Travel smarter. Stay connected. Share the experience.